|
Use the Subscribe button to configure and Manage Dashboard/View and Report Subscription options. A permissioned user may configure as many subscriptions as needed however, each subscription is limited to a single selection for the following drop-down menu options: Include [view], Format [select option], Schedule [select option]. Remember: In the Schedule menu, the Time display is NYC, USA time zone, due to server location. A permissioned user MUST CREATE A CUSTOM VIEW PRIOR TO CREATING A SUBSCRIPTION. Refer to 5.26.1. By default, the Subscription feature sends an email in the selected format (Image, PDF, Image and PDF) only, no data file is included. To include an Excel document with selected data in a subscription, refer to 5.26.1.1. When configured, all subscribed Users will receive two (2) emails for the subscription. One that includes the Image, PDF, or Both AND another one that contains an Excel file with the selected data and an image. |
When configuring Report Subscriptions, keep in mind that this system will TIME OUT after a period of inactivity in order to protect data integrity. When a system timeout occurs, unsaved settings and changes are lost (not retained). Click the Save button on a regular basis to avoid lost settings due to an automatic timeout occurrence.
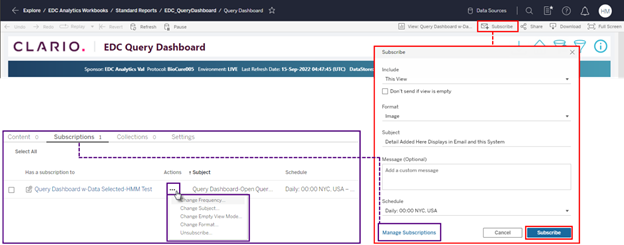
Figure 46: Use the Subscribe Button to Create (New) or Manage Subscription Records
The table below provides details about the options in the Subscription dialog box. Remember to Save your configuration options frequently.
|
Option |
Description |
|
Include |
Open the drop-down
menu and click on an option. This view – This option creates a subscription to a single “View.” A View must exist before it can be selected. Refer to Create a Subscription to for details. Entire Workbook – This option creates a subscription to an entire workbook. |
|
Don’t send if view is empty |
Click in this check box and no email will be sent when a view is empty/unavailable. |
|
Format |
Open the drop-down menu and click on an option. Options include: ·
Image
(image displays in the subscription email) ·
PDF (a
file is attached to the subscription email) ·
Image
and PDF (a file is attached, and the image displays
in the subscription email) |
|
Subject |
The Subject field is automatically populated to match the screen on which the Subscribe feature is accessed. A permissioned user may change or edit the information. The information entered displays in this system and in the subscription emails. |
|
Message |
Optionally, include a custom message that displays on each system generated subscription email. For Best Results: Consider including specific information such as Protocol/Study/Environment/Dashboard, to allow subscribed users to understand the content of the view. |
|
Schedule |
Open the drop-down menu and click on an option to select the Scheduled Timeframe for the subscription report. You may select only a single option from the menu. To configure multiple scheduled options, you may create multiple subscriptions. Remember: In the Schedule menu the Time options display in NYC, USA time zone, due to server location. |
|
Manage Subscriptions |
Click the Manage Subscriptions link to navigate to the Subscriptions grid. Refer to Manage Subscriptions for details. |
Table 3: Description of Options in the Subscription Dialog Box
Related Topics
Navigation and Features
Create a Subscription to a Custom View
Manage Subscriptions